
HC sound lighting network reported
About recording: How to avoid 10 serious recording errors? (on)
In the recording phase of a personal studio,
There are always the same problems emerging one after another.
Learn how to avoid these 10 serious recording errors,
Can make the whole work have a different change!
Always say that if you add meticulous editing and post-work,
It may be possible to save a poor quality recording.
But in the long run,
If the initial recording is good enough,
Those boring rescue jobs are not needed.
Some minor changes in the recording may save me from the abyss of post-processing.
We divided 10 common recording errors into two parts.
In-depth analysis with you,
I hope to improve the recording technology and level of the industry.
Today, let’s talk again about the most common recordings.
The last 5 questions and how to avoid
6, stereo guess
In many recording stages, ear return is the root cause of many problems. For the simple solo insertion recording, the most obvious shortcoming is that the poor quality of the ear will change the tone, thus affecting the tone and emotion of the performance. In addition, the unnatural nature of the ear can affect the quality of the band's performance, so it requires a lot of post-operation and the necessary automation to stabilize the balance with other segments.
How to avoid it?
Don't be too wide or too close when picking up the sound: In order to avoid getting too wide sound image, when using the AB system, the distance between the two microphones should not exceed 60cm, and the angle between the crossed cardioid microphones should be less than 130. degree. No matter which stereo pickup system you use, don't put it too close, because in reality many recording angles are not too wide. For example, the ORTF has an effective pickup angle of approximately 110 degrees. In my experience, the 60cm wide AB system is only suitable for sound field coverage of about 60 degrees. Blumlein's eight-character crossover system is usually not very much covered, especially for picking up large instruments like drums and pianos, because its effective pickup angle is only about 70 degrees, and any sound outside 90 degrees on the front faces a serious problem. Mono compatibility issue.
Example comparison with headphones: It is unrealistic to use headphones to determine the stereo width, because the headphones will widen the recorded image to 180 degrees. In order to improve decision-making power, keep a few familiar commercial recordings at hand, compare them at any time, and use the stereo monitoring plug-in for visual inspection, and occasionally convert between mono and stereo to ensure the consistency of the sound. .
Moving the instrument: If you have got a suitable pan width, then if you want to change the imbalance of the ensemble, the best way is to adjust the positional relationship between the microphone and the instrument. If the musicians are distributed in a straight line across the recording studio, then the most intermediate sound source is 3dB stronger than the 30-degree sound source on both sides, so avoid this setting as much as possible, if it is unavoidable If so, it may be necessary for the outside players to add extra microphones on either side of the edge.
Understanding directivity: The method of crossing the heart-shaped microphone sometimes over-emphasizes the middle sound source, so for the ensemble recording, I will widen the angle between the microphones to at least 110 degrees, so that it can cover almost 160 degrees. range. If you use the MS system, when the Mid is a cardioid microphone, the pickup angle is about 130 degrees, which can achieve a natural balance. If the Mid is a octal directionality, then about 90 degrees will be more appropriate.
If you are using headphones to monitor stereo recording, you can use the Stereo Monitoring Plug-in to help avoid unintentionally over-widening stereo images.

7, the end of the inversion
The basic principle of one of my own recordings is "Never forget - the work of musicians is far more difficult than ours. If our recording settings prevent them from playing properly, it is our fault." Although I can understand this point. (Of course I hope that you understand the same), but I still hear a lot of musicians complaining about the inversion of the engineers, and unilaterally impose some working methods, so that the musicians can not play the normal level. So in the business environment, I feel that I need to warn engineers who have the same habits.
How to avoid it?
If the musicians prefer to play together, find a compromise. Generally speaking, musicians don't like to record, and the recording process is very slow. Usually, when other musicians play, there will be a lot of boring waiting time; when they can't play together, for the musicians, Mastering the coordination between time and music is not an easy task. Mixing is also a very tempering process, as the previously recorded tracks may require a lot of later stages to accommodate the later recorded tracks, so that there is no natural acoustic connection to each other. Of course, for engineers, recording together is also a challenge, especially in a small studio, but this is no excuse, so-called aspiring people do everything!
Participate in rehearsal: Participate in their rehearsal before recording any unfamiliar bands. Record the location of each person based on their location and roughly the line of sight of each person and the band members that can be heard. When making a recording plan, be sure to think carefully based on this layout. If there are times when the plan has a problem of line-of-sight blocking, then it may be solved with a mirror. I like to use the front mirror of the truck, which is cheap first, and secondly, and has a large assembly bracket at the back for convenient racking. On the shelf.
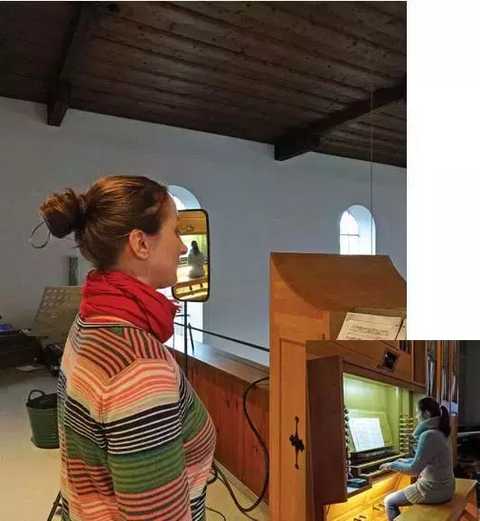
If the recording settings affect the line of sight between the musicians, you can use the mirror to solve them - in the picture, the two musicians can stand back to back, which helps the microphone to be placed.
Beware of segregating performers: When recording an ensemble, try not to isolate the musicians from each other, as physical isolation may affect their performance. No matter if you have any plans, you can do it unless you are satisfied with the musicians. In the long-term perspective, you can do a lot of problems in the recording and mixing stages to solve the problem of mutual leakage of sound, but it is impossible to save a poor performance. Producer Eddie Kramer said, "I don't care if it's classical music or rock or country, you just want to record a complete show!"
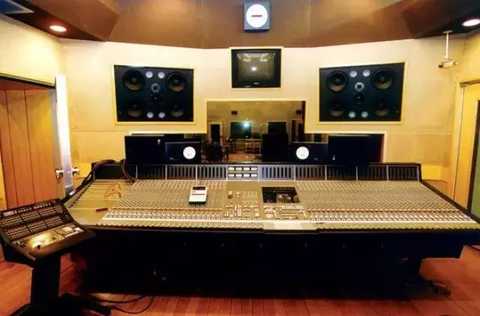
Make communication easier: when re-recording, it's best to communicate in the same room. For electroacoustic instruments that need to be amplified, a long line connecting the amplifier to the instrument is very straightforward (or from the amplifier to the speaker cabinet) and allows the musician to listen to the speakers in each control room. For acoustic instruments and vocals, a dry sound can be picked up (or even built-in) in any control room with the help of one or two quilts. If you need a more open sound, don't neglect to create a recording in the studio. The possibility of the system (or just the keyboard, mouse, system external display).
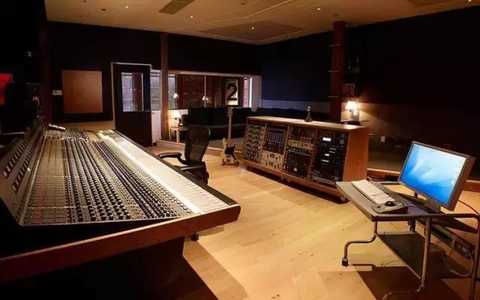
Regardless of the loss of acoustic isolation, it is beneficial to build a recording system in the studio, especially during the recording process. Engineers and musicians can easily communicate, as shown in The Church's Studio.
8, the fear of leaking
When recording multiple instruments simultaneously in a room, the leakage between the microphones increases the difficulty of recording and mixing. So some sound engineers will find the way to achieve the minimum sound leakage at all costs, usually unnaturally using the sound barrier or a separate room to isolate the musicians, or use extreme close-range pickup, which will Completely changed the original sound. Some engineers will also avoid recording together directly, and using a separate recording method will not only take more time, but also suppress the connection between natural music and rhythm coordination. Fortunately, this technique is like an own goal for the mixing phase, because the sound leaks in different tracks can combine the sounds naturally, while the separate recordings require more post-work. To recreate a sense of ensemble.
How to avoid it?
Point the instrument elsewhere: Many sound sources are like electric guitar speakers, and wood-tube brass instruments are inherently directional, a feature that can help you with your preparations. For example, moving the trumpeter to the side by 30 degrees can improve the amount of sound leakage in the other microphone, and it will not affect the overall sound.
Master the balance between sounds: In order to get a good sense of isolation between the microphones, it is best to balance the instruments in the room. If there is too much guitar in the drum kit's microphone, try to weaken the guitar amp or give the room's returning speakers a little more drum sound. If there are too many snare drum sounds in the piano's microphone, then the performer can be appropriately asked to try different drumsticks or drum brushes. When an acoustic guitar or vertical bass and other instruments have a fight (like their microphones pick up a lot of sound leaks), consider adding a DI track so that you can have more dry signal reserves when mixing. . This is the tip used by Frank Filipetti in his GRAMMY award-winning recording album James Taylor's Hourglass, so don't feel uncomfortable, using some DI signals can sound more natural.
Sound leakage including reflected sound: Sometimes, when mixing, the sound leakage of the reflected sound is more troublesome than the direct sound leakage from the instrument, so if you build an acoustic absorber to reduce the amount of sound leakage, it is best to stand around the musician. Get up, not build between musicians.
Check the polarity of the sound: When setting up the return system, make sure to check the polarity when adding a microphone or DI signal, because if there is a problem with the polarity, the sound will have a big problem, and nothing is necessarily the correct setting - Just choose the one that sounds the best.
Start with sound leaks: When adding a microphone to the instrument itself, first listen to what these instruments sound like in the existing track (for example, just listen to the sound that the instrument leaks from other microphones), and then gradually Adjust the corresponding microphone selection. If there is already a bright hi-hat sound in the snare drum, then you may choose a dynamic microphone that sounds thicker to pick up the hi-hat. This way you can start rough mixing from the ones with the most sound leaks, as these will have a big impact on the next microphone selection.
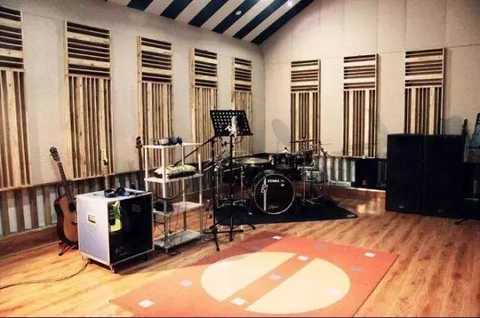
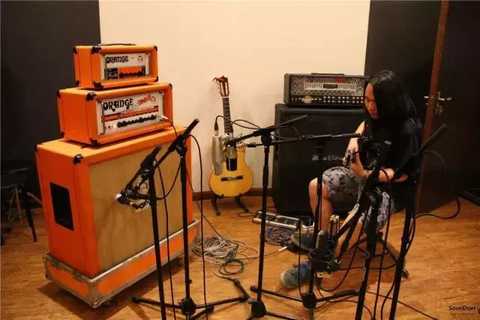
When recording in a small room, there is no reason to generate a lot of uncontrollable sound leakage because of the small space. For example, the guitar amp of the band in the picture is 60cm from the bottom drum, but the sound leakage between them is surprisingly small. First, the balance between the instruments in the room has been adjusted very well. Secondly, the amplifier is directly away from the drum kit, and the most problematic. The side wall reflection is also improved a lot because of the quilt.
9, heart-shaped reflection
Do you use a cardioid microphone for any instrument? If so, you are not alone, because in a small studio, I rarely see the moment of using a omnidirectional or splayed microphone, unless it is affordable. Aluminium microphones (usually in the shape of a figure) and multi-directional condenser microphones. This is a pity, because the directivity of non-capacitive microphones is usually more value for money.
How to avoid it?
Try the omnidirectional microphone: In a normal personal studio, if you want to get a relatively dry sound from the cardioid microphone, the solution is to hang a thick quilt on the back and sides of the musician to block the sensitivity of the microphone. Part of the room reflects sound. To expand, you need another quilt to protect the back of the singular microphone and the entire lap of the omnidirectional microphone. (My own solution is to put the key ring into the carpet and hook it to the ceiling). Omnidirectional microphones have a little near-talk effect and are insensitive to air blasting sounds (such as some blasting consonant biting), so some measures may be needed to get a more dry sound.
Directivity affects tonality: When transforming the polarity of a large diaphragm condenser microphone, the change is not only directional, but also has a large impact on the tone, especially for general microphones – not just because The effect of the low frequency is increased (the octagonal pointing type is the most obvious and the omnidirectional is the least obvious). For example, I recently helped a reader use the Rode NT2A to pick up an acoustic guitar. In this case, the choice of the cardioid type is not perfect. In comparison, choosing omnidirectional is like changing a microphone, and the sound is much better.
Select the directivity with proper acoustic leakage: whether it is off-axis sound, room ambient sound or sound leakage, if these are clearly visible in the recording, then be careful to use the heart-shaped mode of the large diaphragm condenser microphone. This is the best choice for the most unfavorable situation, because the directional and rear side picking sounds are generally not very good, but the omnidirectional and splayed characters can provide a relatively smooth sound at these angles.
If the player loves to move, use omnidirectional: For those musicians who have a large body size when playing, the omnidirectional microphone has a wide pickup angle, a flatter off-axis frequency response and a negligible proximity effect. It is a good choice to keep the sound steady. This is also a small suggestion given to you by many producers Phil Ramone, Al Schmitt, Bruce Swedien, and Michael Tarsia. For the same reason, omnidirectional microphones are also a good choice when picking up relatively large instruments like piano or acoustic guitars at close range.
Choose a microphone that can overcome the sound: if you want to reduce some unwanted sound when recording, whether it is fan noise from the computer, echo reflected from the wall, return sound from the speaker or other instruments, the octagonal microphone is very Advantage. When recording the acoustic part of an acoustic guitar or a duo with a pair of splayed microphones, good acoustic isolation can be achieved. For example, the "curtain" side of the splayed microphone can effectively pick up the chorus part of a large orchestral performance. Because the microphone can be adjusted to a very good suppression of the harsh sound of the copper tube - this is also the tip of Andy Payne's mention of the BBC Proms concert recording in the November issue of SOS 2014.
The octal directional microphone has a very deep suppression of the horizontal plane. Even two very close sound sources can provide very good sound isolation. This is also the reason for using a pair of octal directional microphones when playing self-singing. In the middle, the suppression surface of the vocal microphone is used to align the guitar, and the other microphone is reversed.
10. Maintain a neutral attitude
There are still many studios who believe that more tracks mean more choices when mixing. But in reality this is not an efficient practice. First of all, "open multi-choice" can usually be understood as "avoiding a lot of decisions", so that it is impossible to determine the appropriate recording method. How do you judge whether the microphone is placed correctly? If you don't know the sound in your mind? Secondly, any open choice will lead to more sub-selections. Suppose you use two microphones and DI on the bass at the same time, but there is no coordination between the three, then how many microphones do you need on the guitar during the mix to match the bass? Three? If there are pianos, vocals, etc. So in short, don't hesitate to avoid nightmares in the mix.
How to avoid it?
Export: When the instrument uses multiple microphones or microphones, when DI is combined, there is a way to help you quickly decide to, after balancing these tracks, export an integrated mono or stereo track. Another advantage is that it can reduce the number of tracks in the entire project and speed up the operation. At the same time, if you have the opportunity, you can export the guitar amplification simulator and the analog instrument to the audio track, so that you can not only release the CPU, but also let the project run without much delay or glitch. In these cases, keep the original files in a folder in case you need to reopen them, but don't mess with your main recording project.
Exporting the added amp simulator and MIDI emulation instrument not only frees the CPU, it also speeds up the entire workflow.
Edit before re-recording: Please re-subscribe the required instruments after all necessary edits have been completed. If you don't solve the time problem between the drum and the bass before adding the guitar and keyboard, then after the addition, unless the musicians are very powerful, you have to solve the guitar and keyboard problems. So it's best to get the drum and bass rhythm at the beginning, maybe you don't need to adjust the guitar and keyboard later, which saves a lot of time. Similarly, if you already have enough recorded parts to provide a beat reference, you don't need to add a new metronome track during the re-recording, because the audience will not hear the metronome, so the most important thing is the instrument. The rhythms between the two can be matched to each other, all of which need to be aligned in the digital audio workstation with the corresponding bar/beat grid.

Don't put the vocals to the end: Record the lead singer as early as possible, instead of waiting until the end, you will find that this is a great help for choosing the right sound based on the remaining accompaniment and making the final mix after the completion.
Mixing from time to time: Another way to maintain decisive decision making (improve your mixing skills) is to do a quick five-minute rough mix before each new part is recorded. It may sound strange, but the benefit is that it will keep you re-thinking about how each part of the mix will exist, so you can gradually figure out the problems and still keep a clear head in the final stages. Eric 'Mixerman' Sarafin strongly recommends this method in his book "Zen & The Art Of Producing": If you don't have a clear idea of ​​the balance between the tracks when you finish the last recording, then you completely ignore the track. Bringing you the role, then you need to make some balance adjustments every time you change these tracks.
Editor in charge: Huang Yan
Laptop Bag
Our computer bag can be customized with logo, drawing and proofing can be customized with logo, drawing and proofing.It is more economical than buying different bags. With soft and superior materials, it is comfortable and easy to use.
Jilin Y.F. Imp & Exp Co., Ltd is an exporter and manufacturer (Cang nan Y.F. Stationery & Gift Co., Ltd.)in Creative products, such as Backpack ,Shoulder Bag,Pencil Case, Handbag,Multifunctional Bag. Coin Purse .Cosmetic Bag.Storage bags. File Holder.Canvas handbag and Notebook etc. which is a professional stationery company setting research and development, producing, sales and trade into one. Our company always takes quality, service, efficiency and innovation as our management philosophy. Since our brand Y.F. has been put on the market, the products sell well throughout the country consistently, and be exported to Europe and America,, and South America countries as well as regions, where the product enjoys great customer loyalty and good population. Choose Y.F. is not to choose a batch of stationery, but to choose a commitment and responsibility, Thanks for your attention, support, trust an cooperation. Wish to establish long-term business relationship with you in the near future.
PU Laptop Bag,Cork Laptop Bag,Leather Laptop Bag,Bags Laptop,Laptop Bags Backpack,Geometric Luminous Laptop Bag
Jilin Y.F. Import & Export Co.,Ltd , https://www.jlpencilcase.com